
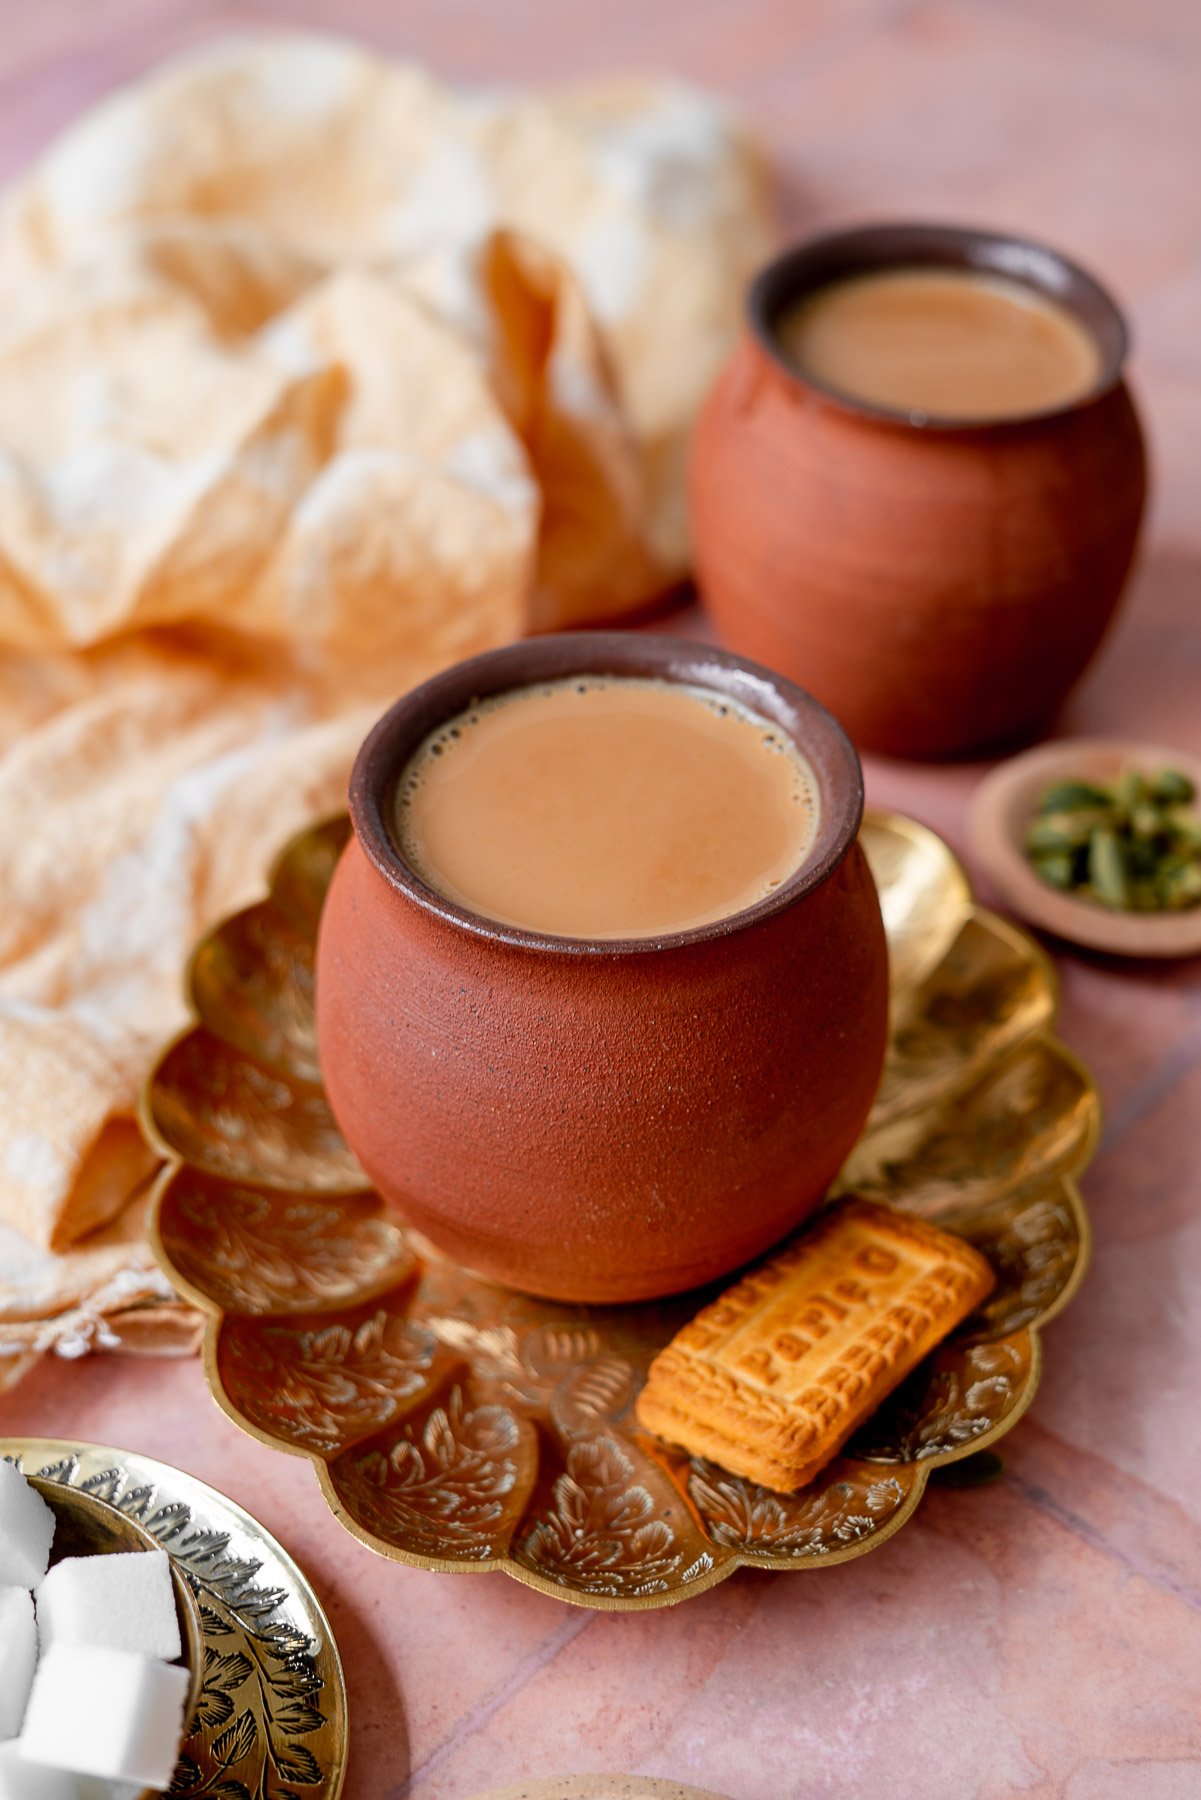
It's cozy tea season and these Masala Chai Canelés are the perfect treat! Canelés are a pastry flavored with vanilla and rum from Bordeaux, France. They're popular for the contrasting dark caramelized exterior and soft custard interior that are a result of baking at high temperature. The crackling sound as you bite into them is so so satisfying. These canelés are made with a base of delicious masala chai.

Unfortunately, they're rarely seen outside of France except at some specialty bakeries such as Dominique Ansel in Soho.
And can I say they're absolute perfection with tea or coffee? It inspired me to add masala chai into the mix! I know some French person is probably rolling in their grave with my addition, so let me preface this and say these ARE NOT authentic canelés for several reasons, i.e. the mold, seasoning, and flavor.
Jump to:
Most cookbooks and blogs that I referenced mentioned that these pastries take some skill and technique to perfect, but that they're easy enough to make with some attention. Like all good things that take forever, the reward is high at the end! Intrigued, I took about a week compiling information, tips, and trialing recipes to get it right.
Buckle up, this is going to be a fairly long post. Stick with me, I promise it will give you all the information you need to perfect canelés on your first try (fingers crossed!).
Canelé Molds
The first thing you'll need for the signature look is ridged, fluted molds.
After reading a ton about canelé molds, I came to the conclusion that getting copper molds were the move. The copper's ability to conduct heat gives canelés that trademark crunchy exterior while keeping the inside custardy.
Will I ever use them again? TBD. I don't regret spending $29 on 4 molds. The copper did wash off a bit during seasoning and baking because the butter bubbles down the sides. You can splurge and get the ones that are $30 each from Bordeaux, but I genuinely don't see why unless you're an enthusiast or you own a bakery.
While I didn't test the silicon molds, most people said they just couldn't achieve the same texture with them. If you want to try and use the baking molds you have, check out this website. Scroll about ⅔ of the way down, and they actually tested different molds you can use to bake canelés.
Seasoning Copper Canelé Molds
If you're planning on using copper molds, YOU MUST SEASON THEM. My first time around wasn't done right and the canelés took half an hour to detach from the sides. The first batch was edible, but ultimately trash. It was an absolute nightmare.

Traditionally, a 50/50 ratio of beeswax and butter is used to season the molds. Beeswax, that too food-grade beeswax, is not readily available to me unless I order ahead from Amazon. That, too, it's something I'll never use again. My goal was to use what was in my pantry here since I already spent money on molds. If you do choose to use beeswax, make sure it has no additives and is food-grade.
- Melt half a stick of unsalted butter. Pour the butter into the mold, coating it with a thin layer on all sides. Pour it into the next mold and repeat.
- Bake the molds at 500°F for 20 minutes.
- After they bake, drain the excess butter and wipe away any burnt bits.
- Placed the molds in freezer for at least 30 minutes before using them to bake.
- Before using the molds, brush a thin layer of melted butter on the inside of the mold. Nonstick spray also works.
Over time, the seasoning will become stronger. Be sure to gently wipe the molds with a paper towel after use to clean them. Do not scrub or scratch, otherwise the seasoning will be damaged.
☕ Let's Talk About Chai
Chai means tea. Masala is a mixture of ground spices.
Thanks to Oprah's chai tea latte at Starbucks, chai became widely popularized in the U.S. as some watered-down cinnamon heavy tea. People everywhere began saying "chai tea"... "chai tea", meaning "tea tea"... I cringe every time I hear it. Don't be this person.
Chai typically refers to black tea with milk, the drink of choice for people on the Indian subcontinent. It's a huge part of our culture whether we're en route somewhere, cozying up at home, or bonding over chai with family and friends.
Masala Chai
Masala chai is black tea boiled with whole milk and aromatic spices - the most common being cardamom, black pepper, cloves, cinnamon, and ginger. Hence, chai masala is the spices used to make masala chai.
If a recipe says "chai spice glaze," I'd expect for there to be cardamom, cloves, etc to make the glaze aromatic and flavorful. If it says "chai glaze," I'd expect for the recipe to use black tea leaves to make a glaze. This recipe is called Masala Chai Canelés, which means you'll be making masala chai and using it to flavor canelés!
For this recipe, I ask you to use a masala chai mix to simplify the ingredients. You can buy from quality brands like Madhu Chocolate, One Stripe Chai Co., Kolkata Chai Co., or concentrates like Dona Chai. You can also make your own masala chai without using water. If making your own masala chai, use a minimum of 2 black tea bags and add about 10ml of milk to account for any that evaporates and allow a longer cooling period.
Note: We're using cardamom powder in addition to what's in the masala chai. We add it at two different points because the first addition is to allow the flavor to mingle with the batter for a few days, and the second addition is for the fresh fragrance it lends.
How to make the Batter
Amazingly enough, all the ingredients for canelés are pantry items!
The only thing here is that the batter needs to rest for a minimum of 12 hours and a maximum of 4 days, so plan ahead. I'd recommend 24 hours for the flavors to develop. If you're not eating it immediately, you can even bake a few a day to maintain the crispy exterior.

Step 1. In a sauce pan, bring the milk, butter, and masala chai mix to a simmer. Continue to simmer until the butter has melted and the masala chai has fully infused.
If you're making your own masala chai, add 10ml of milk to account for any that boils off.
Step 2. Allow the milk to cool to about 125°F, measuring with a thermometer or when you can touch it without burning yourself. Pour the milk through a fine mesh strainer to remove any tea leaves.
Step 3. While the milk is cooling, whisk together the egg and egg yolks in a large bowl until the mixture is homogenous. Do not whisk past this point. In a separate bowl, whisk together the sugar, sifted all purpose flour, half the cardamom powder, and salt.
Step 4. Once the milk has cooled, continuously whisk the eggs with one hand and begin slowly pouring the milk down the side of the bowl with the eggs. This brings up the temperature of the eggs without cooking them. Continue tempering the eggs until all the milk has been whisked in and the custard has formed.
Step 5. Slowly whisk in the dry ingredients, making sure to remove all lumps but not overmixing to aerate.
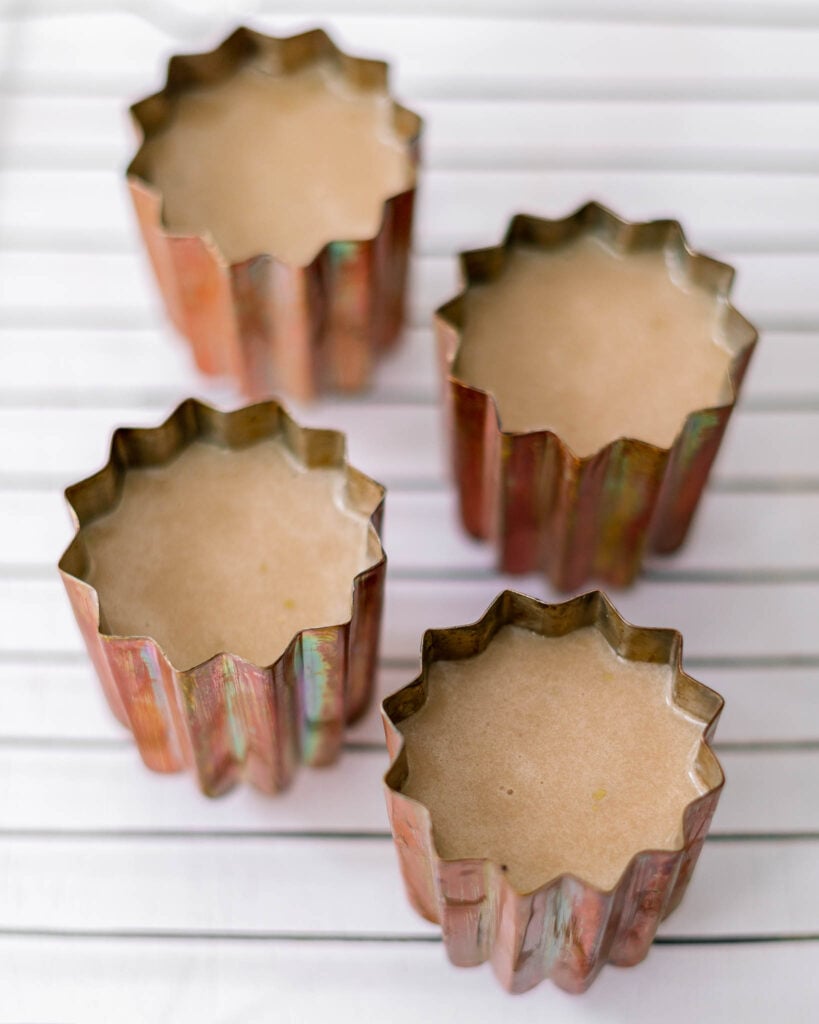
Step 6. Strain the batter into a pitcher, preferably with a spout. Cover and refrigerate.
Baking the Canelés
Allow the canelé batter to rest for up to 4 days to develop the flavors. It will separate into layers at this point, with solids at the top. Give it a good whisk to make the batter homogenous again. Add in the other half of cardamom and gently whisk.
Preheat the oven to 550°F. Brush the molds with melted butter before use. Pour the batter ⅘th of the way up the mold. Place the molds on top of a baking sheet outfitted with aluminum foil. Bake at 550°F for 10 minutes.
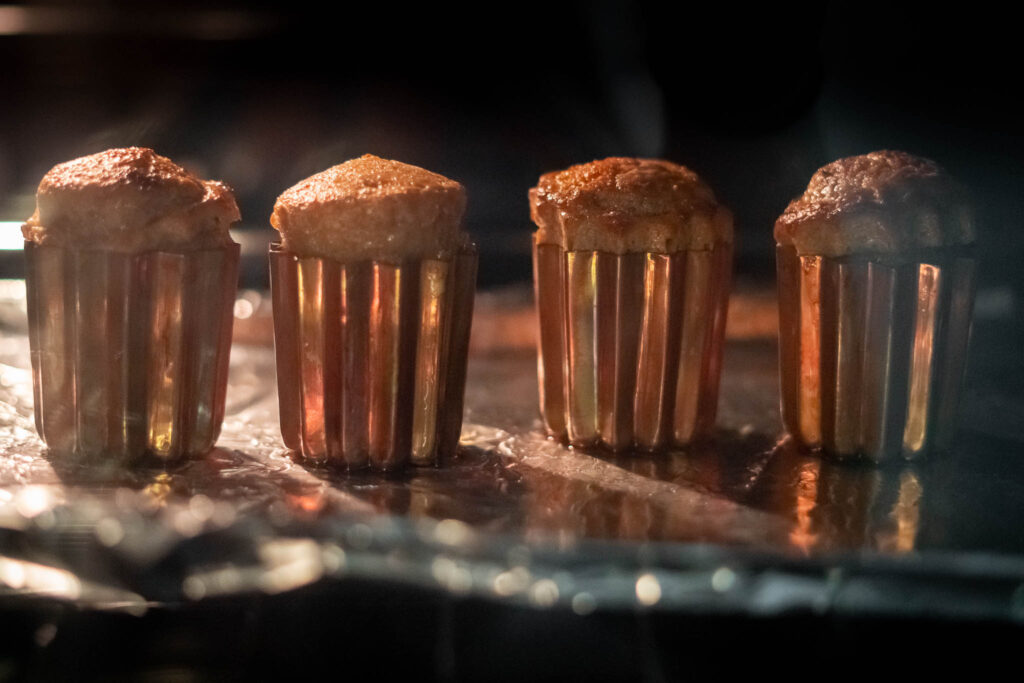
Reduce the temperature of the oven down to 450°F. The canelés may rise above the molds, but they will deflate like soufflés. Bake for another 30 minutes, keeping a close eye on them towards the end. The pastries will significantly darken to form a crunchy caramelized exterior. Pull them out before they look like they'll burn. A good indicator is that the butter stops bubbling on the sides.
The canelés should be removed from their molds as soon as possible. Removing them should reveal a gorgeous dark, thick crust all around the pastry. Use hot hands or oven mitts to handle the molds. They should slip out of their molds when flipped upside down. Cool them on racks for at least 30 minutes. This allows them to set and the exterior to properly harden as the moisture evaporates.
If you only bought four molds like me, all you need to do between batches is allow the molds to cool and wipe them clean. Brush with butter, replace the aluminum foil on the baking tray, and then reheat the oven to 550°F.
Troubleshooting Canelés
My first few batches had a few issues - so I'll go over them here to help troubleshoot.
Some forums said this could be because of air incorporated, but I was very careful about this my second batch and it didn't make a difference.
Another blog said to take your canelés out of the oven if they start to rise and poke holes in it. This reduced the overall temperature of the canelé and the oven from opening and closing it so the inside texture was off. Yet another blog said to just take them out of the mold once fully baked and let them deflate on a cooling rack. This kind of worked, but left them lopsided. Highly recommend avoiding these.
I baked a few batches at 350°F and 400°F and kept having this issue despite starting the bake at 550°F to form the outer shell. I also realized the left side of the oven had a fan blowing, causing a few canelés on that side to mushroom while the others were steady. Once I cranked up the heat to 450°F for the last 30 minutes, I didn't see ballooning but instead a steady rise that eventually deflated.
White butts means the top of the canelés are white when they come out of the mold. This usually happens when the canelés mushroom out of their mold and do not deflate. The middles are usually pretty hollow when this happens.
Do not overfill the molds. If it expands out of the molds without deflating later on, the pastry doesn't touch the top of the mold again. Without the high heat from the mold, the canelé doesn't caramelize on the top, resulting in "white butts."
If there are white butts, they can be popped back into their molds and go back into the oven.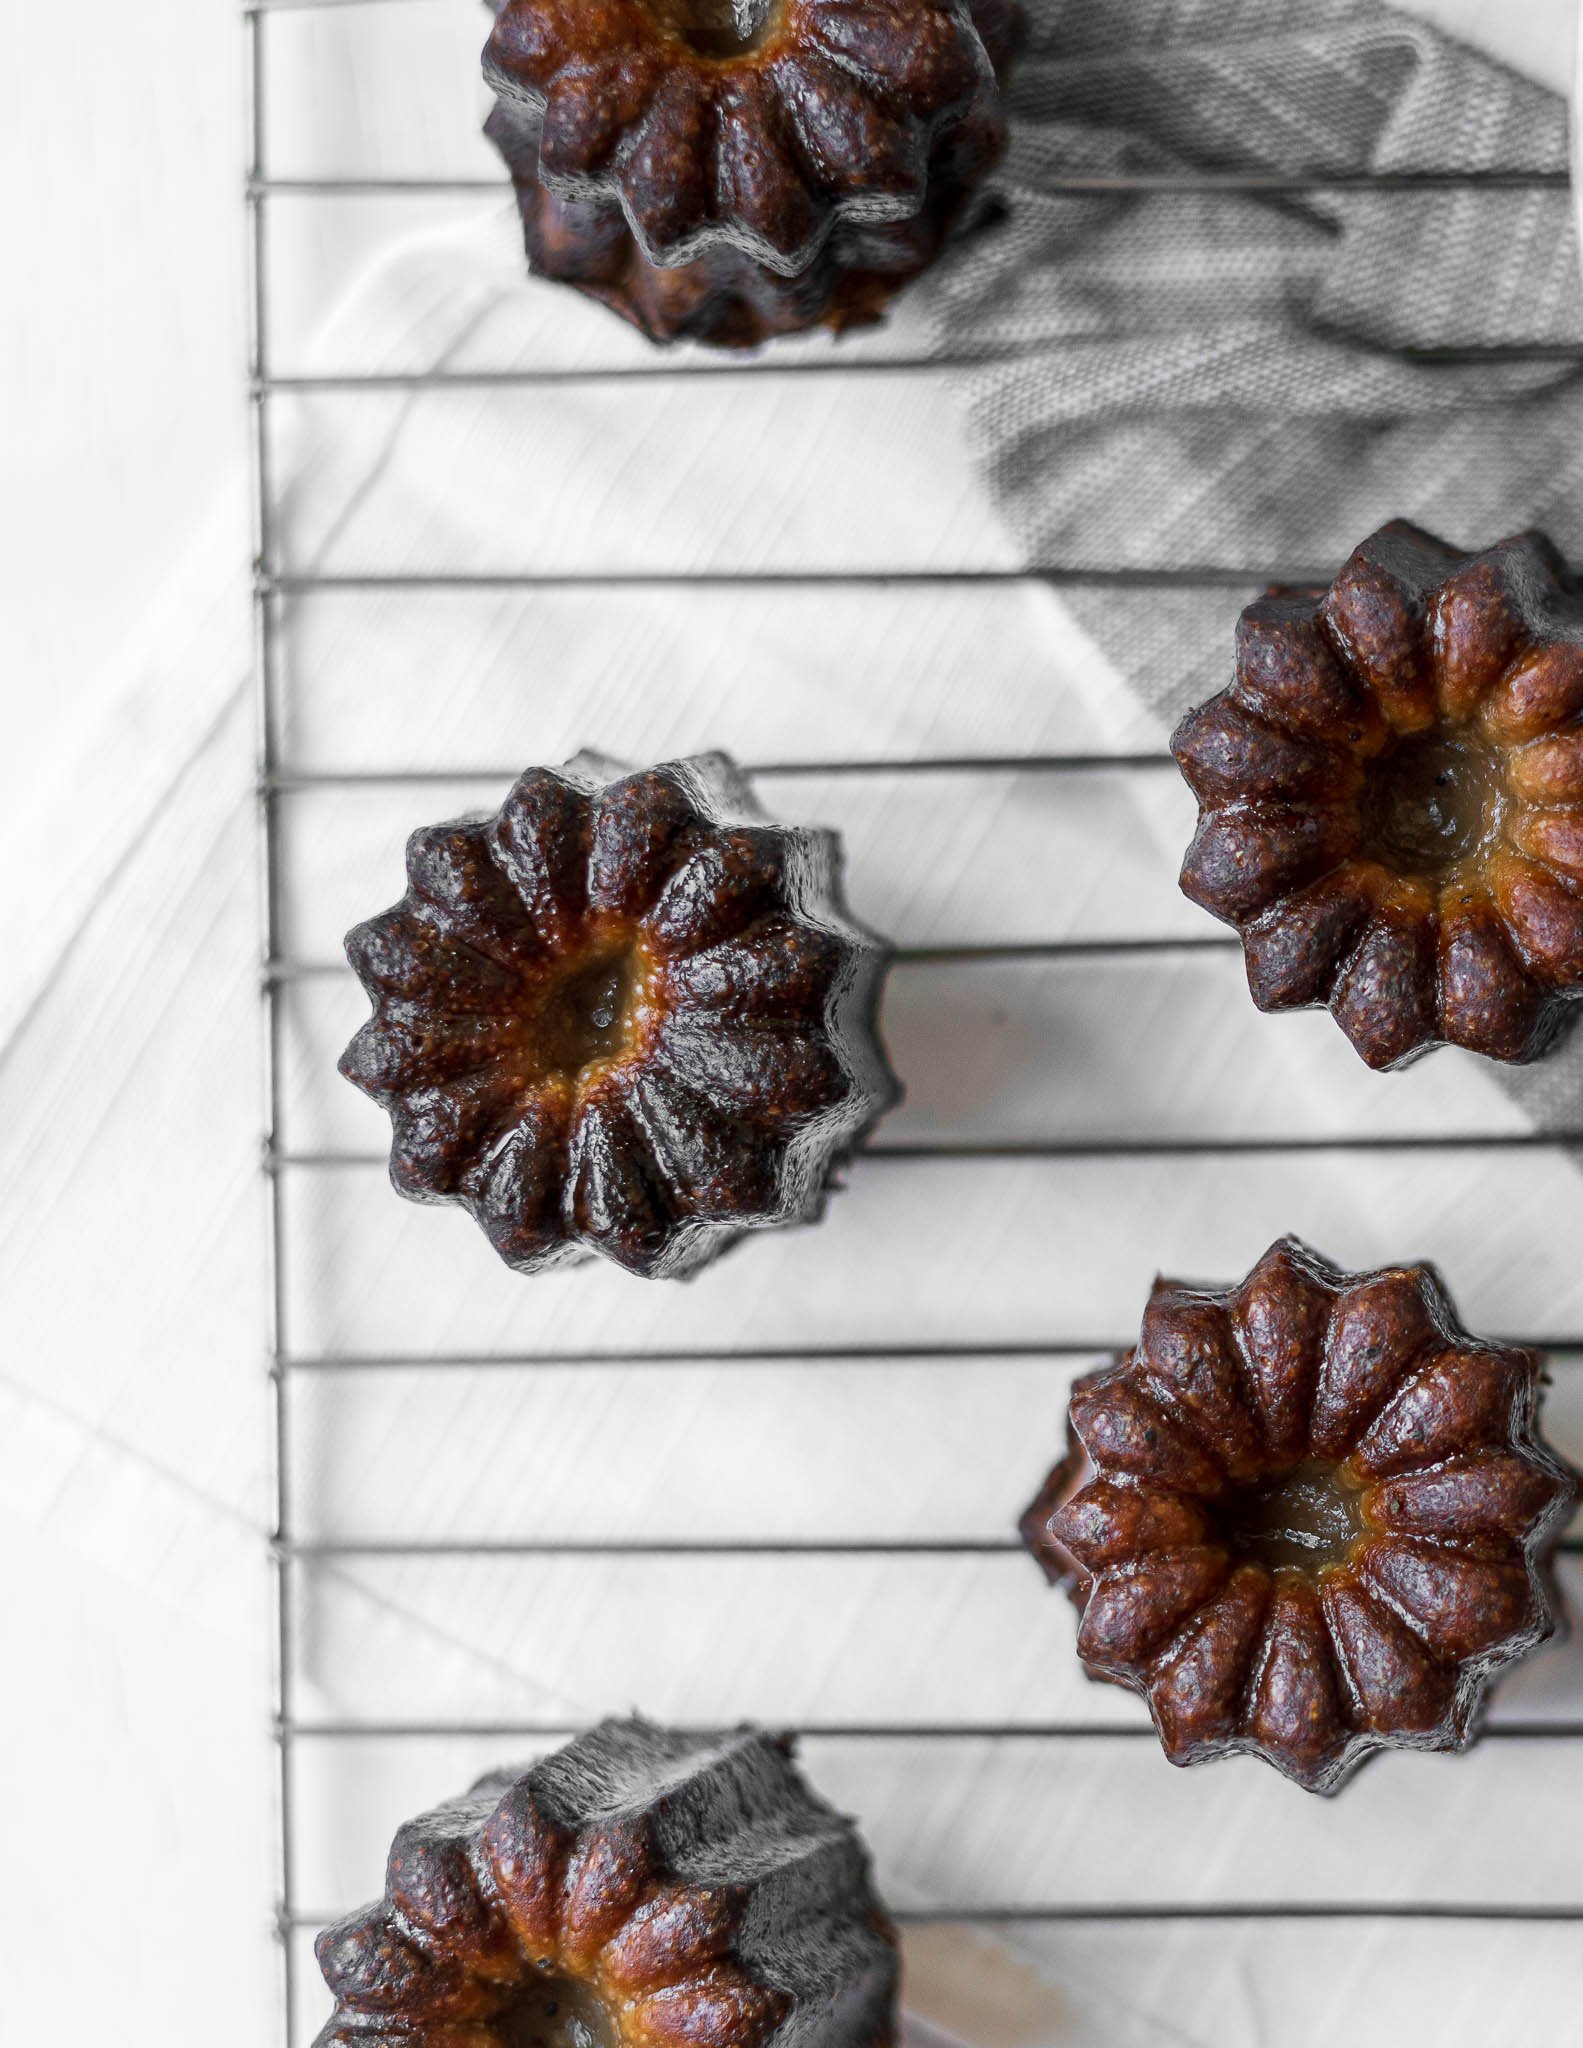
They haven't been properly seasoned and greased before use.
If they don't slip out, there are three ways to troubleshoot:
1. Bang the molds on a hard surface on each side. The canelés should release
Use a thin, heat resistant stick, i.e. a cooking thermometer. Carefully insert around the edges to release.
2. Use a fork and peel it out. If you need to resort to this, take out as much of the canelé as you can salvage (still edible!). Carefully soak the molds in water, being careful not to expose the exterior to water. After soaking for up to 30 minutes, pour the water out and gently wipe away any crumbs with a paper towel.
I baked a batch at 350°F for 50 minutes and had this issue.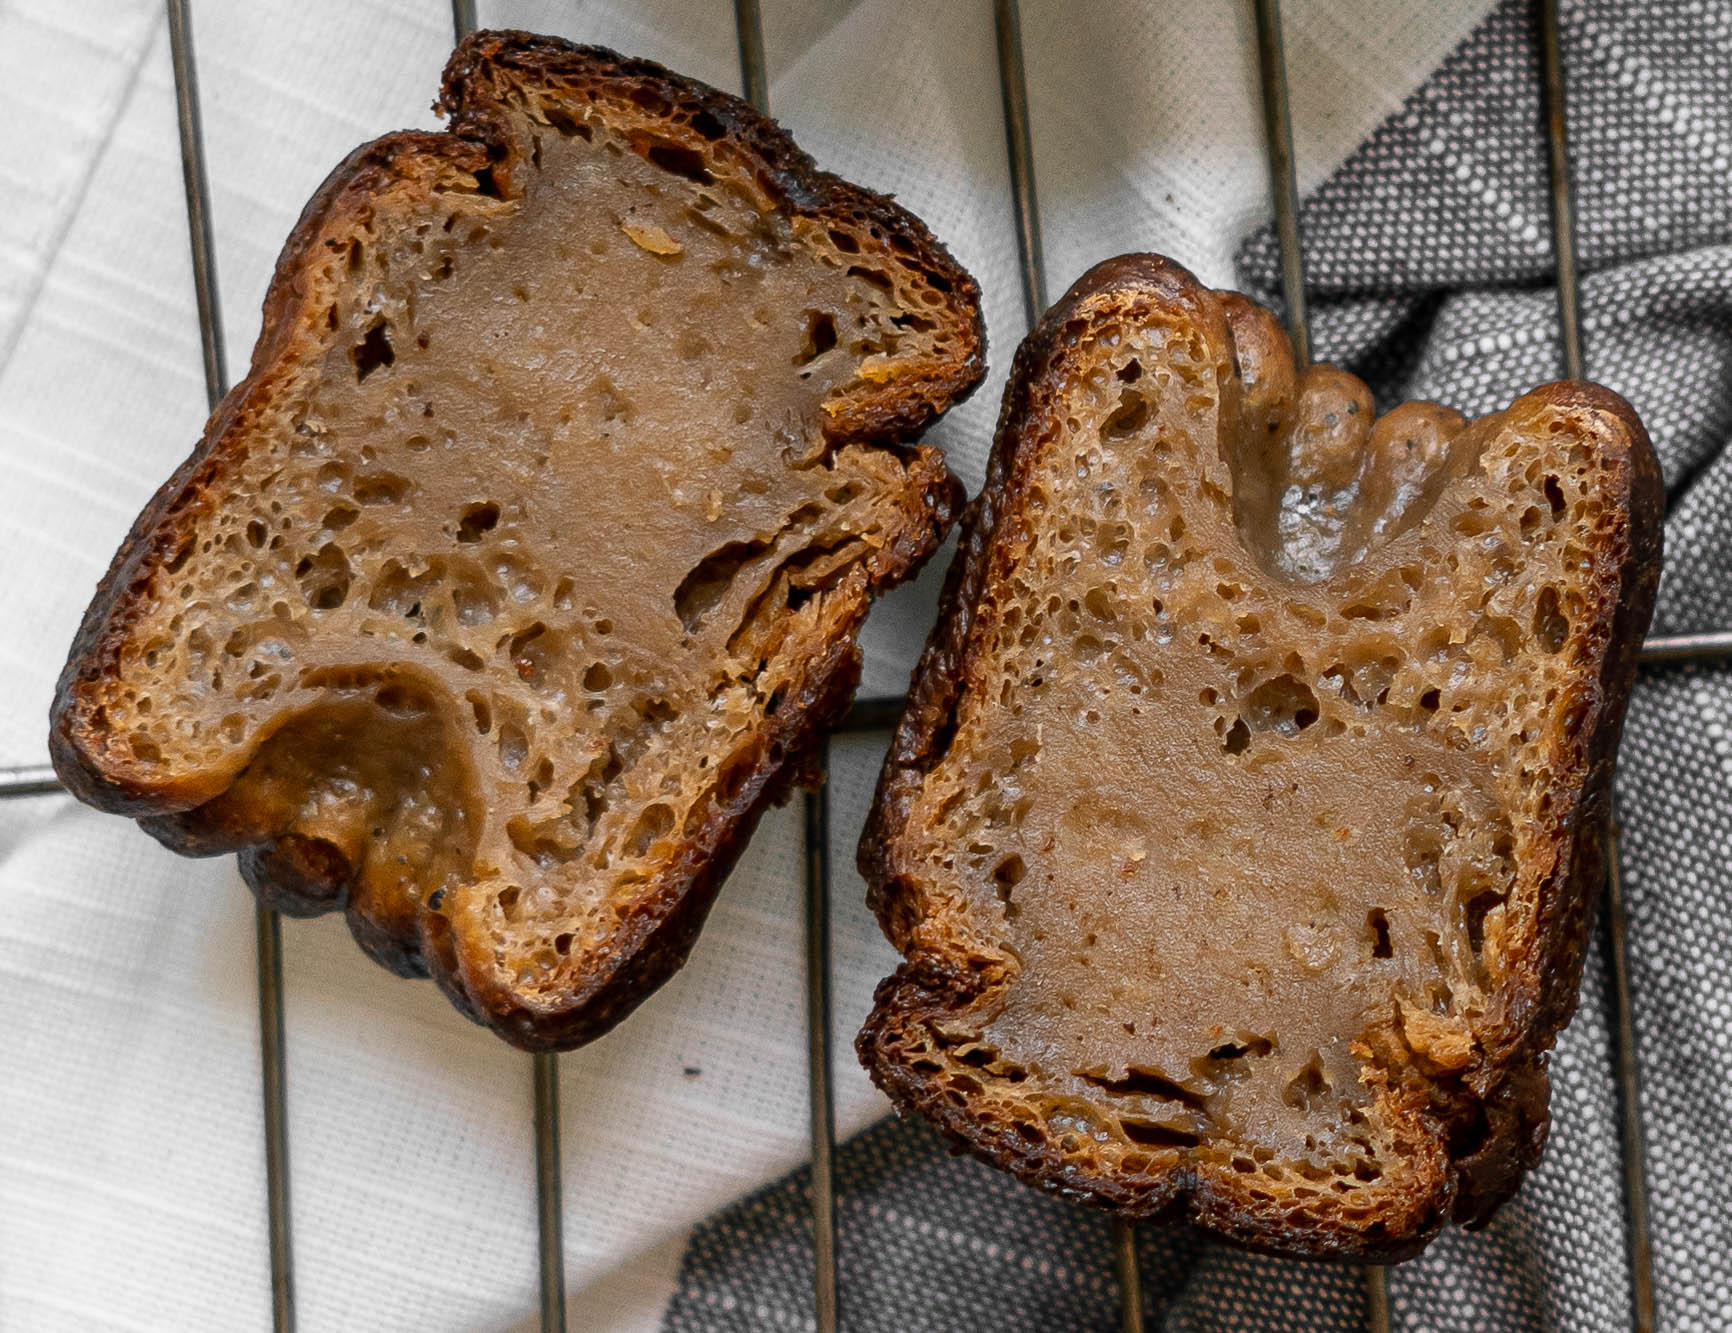
I found that I only got the perfect texture on the inside when I baked the canelés at 450°F for the last 30 minutes. Any lower and they wouldn't have the bread-like bubbly texture throughout that's still soft and custardy.
How to Store
Honestly, I haven't found a way to maintain a crunchy crispy canelé. I tried air frying and baking in the oven and it's not even remotely as satisfying. If anyone has, let me know in the comments! Canelés are best enjoyed fresh within 3-5 hours of baking and served with tea or coffee.
If you must store canelés, store them in an airtight container on a countertop. Enjoy them as spongey cakes the next day.

More Chai Related Recipes to try
- Chai Concentrate
- Masala Chai
- Chai Liqueur
- Chai White Russian
- Chai Spice
- Chai Syrup
- Chai Hot Chocolate
- Chai Spice Chocolate Chip Cookies
Recipe
Want to Save This Recipe?
Thinking about making this recipe? Enter your email and I'll send it straight to your inbox to save for later. Plus, get new recipe inspiration from me every week!
By submitting this form, you consent to receive emails from Masala and Chai.

Masala Chai Canelés
Ingredients
- 500 ml whole milk
- 1 tablespoon masala chai mix
- 200 g sugar
- 40 g unsalted butter
- 100 g all purpose flour
- pinch of salt
- 2 eggs
- 2 egg yolks
- 1 teaspoon ground green cardamom
Instructions
Day 1 - Make Batter and Season Molds
- Bring the milk, masala chai mix, and butter to a simmer in a sauce pan until the butter fully dissolves and the color is a light tan. Allow the chai to cool until it reaches about 125°F. Strain the chai and make sure all tea leaves are completely removed.
- In the meantime, whisk together the eggs and egg yolks in a large bowl. Only do this until they're homogenous, but not so much that it aerates. Sift the flour, sugar, ½ teaspoon cardamom powder, and salt into a separate bowl.
- Once the chai has cooled to 125°F, slowly pour a steady stream chai down the side of the bowl with the eggs while whisking the eggs to create the custard. Slowly add the flour mixture while continuing to whisk until the batter is fully mixed and there are no lumps. Strain the batter into a pitcher with a spout. Cover it and refrigerate for a minimum of 24 hours.
- Season the canelé mold (refer to section "Seasoning Copper Canelé Molds")
Day 2 - Rest Batter
Day 3 - Bake
- Preheat the oven to 550°F. Line a quarter/half sheet tray (depending on amount of molds) with aluminum foil. Remove the batter from the fridge. It'll have separated into layers with the solids at the top. Give it a good whisk to reincorporate the ingredients. Whisk in the other ½ teaspoon of cardamom at this point.
- Lightly brush melted butter in the insides of the molds. Pour the batter into the molds about ⅘ of the way to allow for some rising. Set the molds on the baking sheet and pop it into the oven for 10 minutes. After 10 minutes, reduce the heat to 450°F and bake for another 30 minutes without opening the oven door if possible. Bake until the bottoms have properly caramelized to a very dark brown, before it gets burnt.
- Remove the tray from oven and place on a heat safe surface. Using an oven mitt, turn the mold over. The canelé should pop right out. If not, bang the mold on a surface and turn over again. Place the flat side down on a cooling rack. Allow the canelés to set and cool for a minimum of 30 minutes. Serve with chai.
Leave a Reply